

785 0 comments

Retractable tonneau covers are extremely practical. They not only protect goods and improve transportation efficiency, but more importantly, they also enhance safety. Therefore, they are very popular among vehicle owners.
However, many vehicle owners find installing retractable tonneau cover a headache, having no idea where to begin. Some owners have even successfully installed retractable tonneau cover, but feel they are not secure enough.
No problem, in the following, we will use the OSIAS retractable tonneau cover as an example to give you a detailed installation tutorial.
Preparation before installation
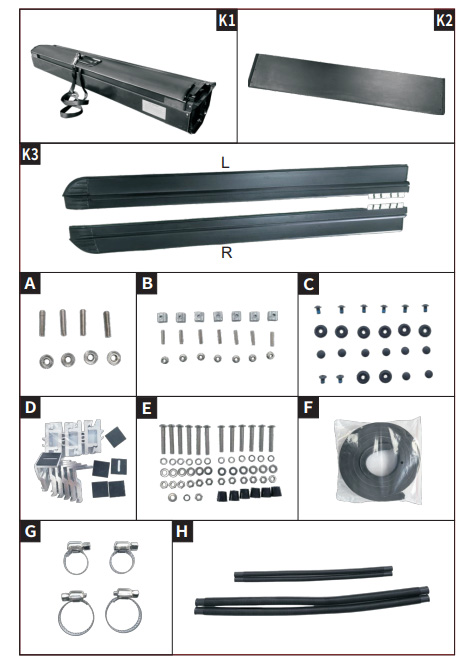

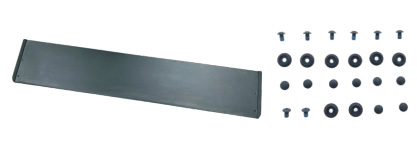
Before installation, we need to check that all required parts are complete and in sufficient quantity. It's important to note that each part should be kept separate for easy identification during installation.
Installation Process
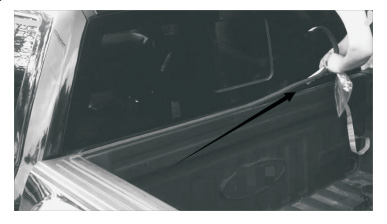
Step 1: Wipe the mounting surface clean.
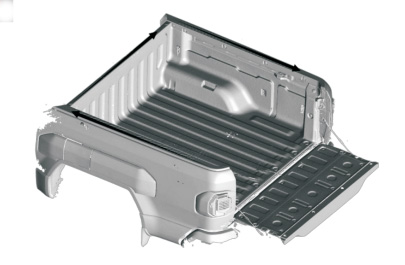
Step 2:Attach the F foam from the product accessory catalog to the cleaned rear lateral cab sill to achieve a sealed and waterproof effect.
Step 3:
1.If there is a hole in the rear side of the cab, no need to drill.
2.If there is no hole in the rear side of the cab, a 28-30mm hole needs to be drilled in the inner side (ensure the hole surface is smooth to avoid hand injury).
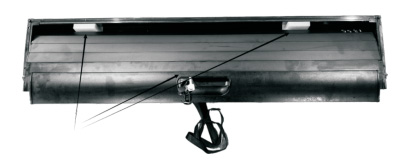
Step 4:Note: Place the canister on the foam of the original packaging during assembly to avoid scratches.Remove the protective cotton from both sides of the roller shutter slats (K1) inside the canister, and pull out the three aluminum strips from the canister to facilitate the next assembly step.
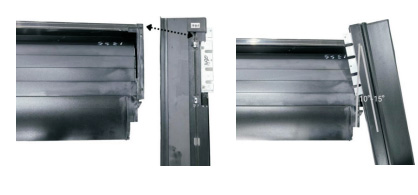
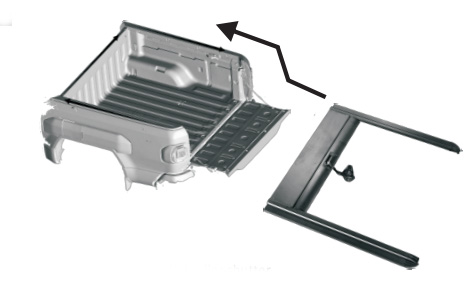
Step 5:Place the side rails(K3) next to the canisteras shown in the figure.
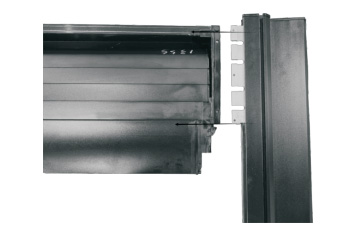
Step6:Align the circular holes on the reverse side oftheside rails(K3)with the limit buckles on the caniste. After aligning the side rails with the limit buckles,open them outward by 10-15 degrees, and then slide the side of the lock head into the sliding grooves of the side rails(K3)
Tips: Avoid excessive operation leading to product damage.
Step 7:During assembly,slightly wiggle the side rails(K3)to align the pre-embedded nut holes inside them with the screw holes on the can. This allows for the smooth installation and tightening of the 6mm-diameter screws marked "A". Afterwards, install the lock nuts also marked "A" and fasten them with a wrench.
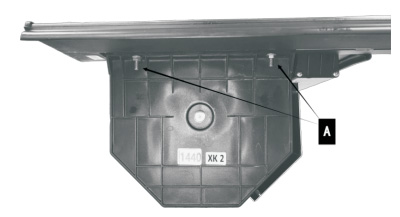
Step 8:Remove the screws and decorative covers of the cover plate marked K2 and the cover plate marked Cas specified in the general instructions.
Step 9:Align the cover plate (K2) with the screw holes on the brackets of the side rails (K3).

Step 10:Use the cover plate screws marked "c" in the catalog to fasten the cover plate to the side rail brackets with a Phillips screwdriver, then attach the decorative caps.
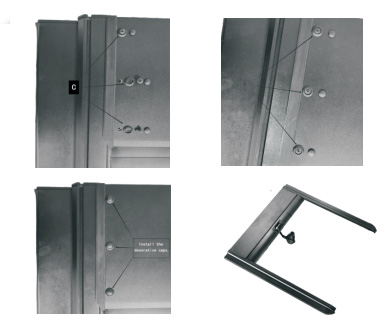
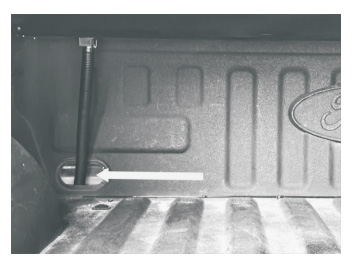
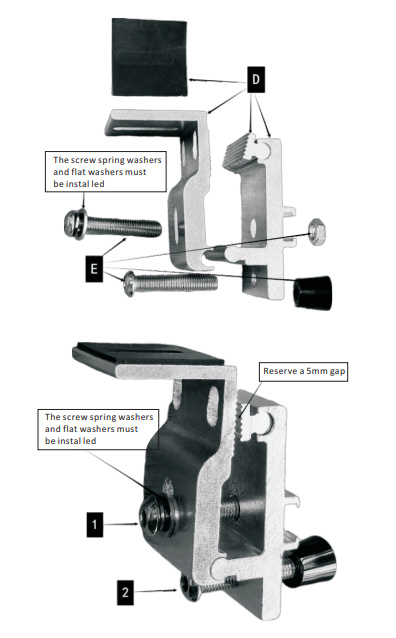
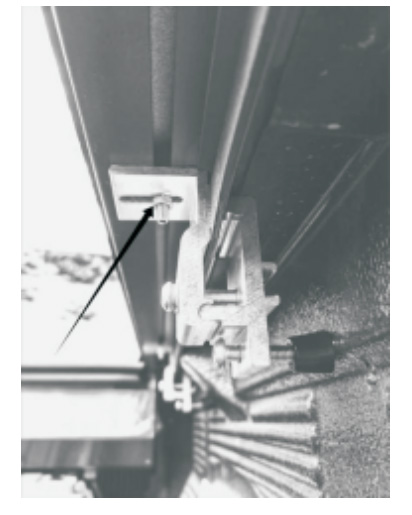
Step 11:The mounting bracket connected to the vehicle body is assembled from parts D and E. Tighten bracket D/E with Screw 1 to fix it to the vehicle body, and use Screw 2 and the foot pad to prop against the vehicle body for adjusting the verticality of the bracket.
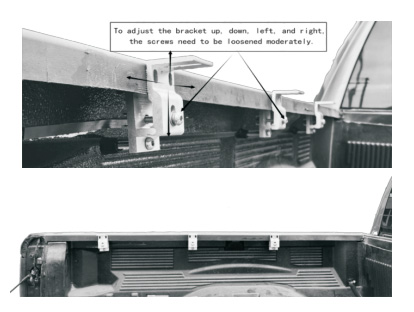
Step 12:Secure the assembled mounting brackets (4 for compact pickups, 6 for full-size pickups) to the upper parts of the side rails on both sides, adjusting their front and rear positions as needed during installation.
Step 13:Two people lift the assembled roller shutter cover from both sides and place it onto the truck bed rails.
Step 14:Assemble the B screw kits into a T-shape, insert them into the sliding grooves at the bottom of the side rails, and match their quantity to that of the mounting brackets shown in the figure above (each screw kit contains more screws than actually required to prevent loss during installation).
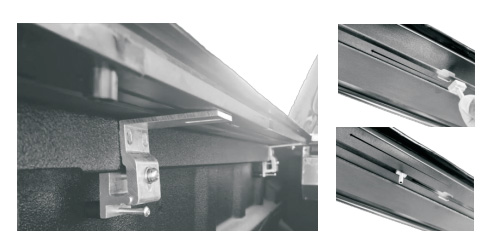
Slightly lift the side rails on both sides to align the screws with the mounting brackets already installed on the vehicle body.Attach the lock nuts from the B screw kits, but do not fully tighten them-leave them loose and movable.
Step 15:Move the roller shutter cover left and right to center it symmetrically; then move it forward and backward to achieve a reasonable installation position where, when the rear door is closed, the roller shutter cover overlaps the closed rear door by 1 centimeter.
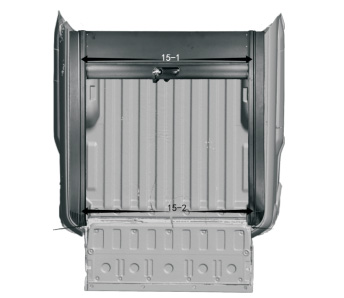
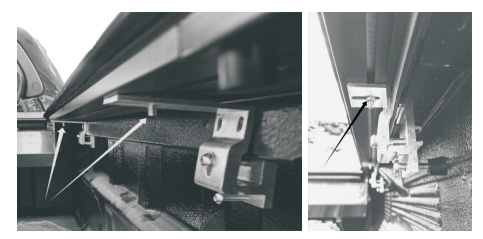
1. Before tightening the fixing nuts of the mounting brackets, recheck the width dimension of the rear track (15-2) shown in the figure above.It must not be larger than the width dimension of the track behind the cab (15-1), and the width of 15-2 can be 2-3 millimeters smaller than that of 15-1 to ensure the tonneau cover locks stably after closing.After adjusting the track width of the tonneau cover to the appropriate dimension and its proper position on the vehicle body, tighten the anti-loosening nuts of the mounting brackets.
2.The process of securing the mounting brackets is crucial for the smooth operation of the tonneau cover and the waterproof effect achieved by its horizontal fit with the vehicle body.If the horizontal heights of all mounting brackets are inconsistent, the tonneau cover will not operate smoothly in the tracks.
3.If the tonneau cover fails to operate smoothly in the tracks after tightening the screws of the mounting brackets, please patiently adjust the verticality and levelness of individual mounting brackets to ensure the contact surfaces of all mounting brackets with the tracks are on the same horizontal plane.
Step 16:Use a Phillips screwdriver to attach the 4 G-type hose clamps and 4 H-type drain hoses from the accessory package to the drain outlets of the cargo box and the side rails on both sides respectively. Most pickup truck beds are equipped with drain outlets on their inner sidewalls-insert the drain hoses into these inner wall outlets to channel water away. For vehicles without pre-installed drain outlets, drill holes in the sidewalls at positions corresponding to where the drain hoses are mounted on the tonneau cover. (note: ensure the hole walls are smooth to avoid hand injury), then insert and route the drain hoses through these drilled holes.

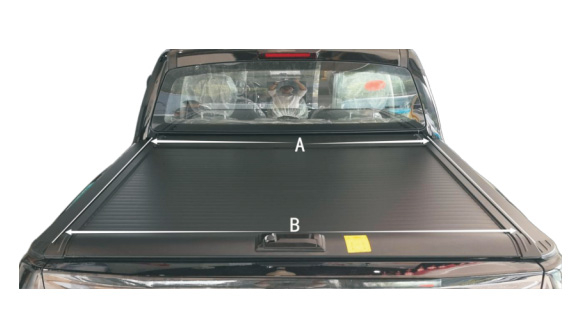
Step 17:Ensure all bolts are fully tightened. Close the roller shutter and check if the rollers are parallel on both sides as shown in the figure. Measure dimensions A and B marked in Figure 17-B must not be larger than A, and B can be 2-3mm smaller than A.
Conclusion
This concludes our guide to installing Retractable Tonneau Cover. If you purchased your retractable tonneau cover from OSIAS, you can install it directly according to the instructions. If you have any questions, please feel free to contact us, and we will provide you with the most professional feedback as quickly as possible.

Latest

New

New
OSIAS AUDI A3 S3 Cold Air Intake
$140.00

New

New
OSIAS BMW X3 X4 Cold Air Intake
$240.00

New
OSIAS BMW 540i Cold Air Intake
$185.00

New

New
OSIAS Audi A4 A5 Cold Air Intake
$160.00

New

New

New
Write a comment